Client Onboarding Automation: From Intake to a Reliable Handoff
By Farzam Saadat | Published | 7 min read
Client onboarding automation uses a defined set of rules to turn an accepted project into organized records, workspace access, welcome instructions, and assigned next steps. With n8n, you can connect those steps across business tools. The useful starting point is a clear handoff: who starts onboarding, what information is required, and who takes over when something is missing.
An agency can send a polished welcome email while still leaving its project manager searching for files. A bookkeeping firm can create a client folder while still lacking the documents needed to begin work. Automating a single message does not solve the whole handoff. The process needs a shared record of what has happened and what remains outstanding.
What should you automate first?
Start with repeatable administration after a project has been accepted. A useful first workflow records client details, checks whether the project already exists, creates its workspace, sends approved instructions, and notifies the person responsible for delivery.
Keep scope approval, unusual access requests, and changes to commercial terms with a person. Before building anything, write down the event that authorizes setup. That might be an internal form submitted after contract approval. A public inquiry should not automatically receive access to a client workspace.
For a small professional-services team, the first version can cover one service package and one internal owner. Expand after the team has used the process and identified genuine variations. Trying to automate every client type immediately makes the rules harder to test and maintain.
Define the information the workflow needs
A practical intake record contains a project reference, client or company name, contact email, service package, internal owner, and agreed start date. Add a checklist of required materials if different services need different inputs. Collect only information that has a defined purpose in the process.
Use a stable project reference rather than a company name as the main lookup key. The same client can buy two services, and company names can be entered differently. A reference such as WEB-1042 identifies the engagement without relying on spelling or email capitalization.
Choose clear statuses: Ready for Setup, Setup in Progress, Awaiting Materials, Ready for Kickoff, and Needs Attention. Define who can change each status. A sent email should not automatically mean that the client supplied everything or that the delivery team approved the handoff.
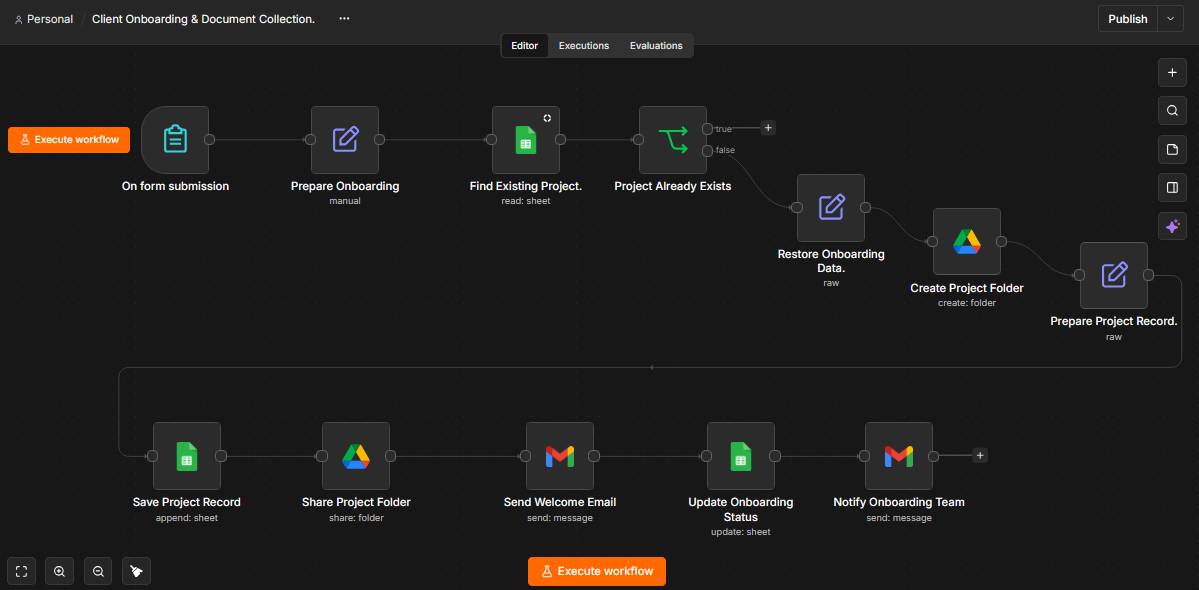
Design the workflow around five checkpoints
1. Validate the intake
Check the required fields before creating anything. Normalize the contact email and project reference, and reject blank ownership fields. If required information is missing, notify the internal submitter with a specific correction request. Do not create a partly named folder and hope someone fixes it later.
2. Check for an existing project
Look up the project reference before creating the record or folder. If it already exists, send the existing record for review or stop with a clear explanation. This reduces repeat setup from accidental submissions.
A lookup alone is not complete duplicate protection under concurrent submissions: two runs could both check before either writes. For higher volumes, use a store that enforces a unique project key or serialize setup. This is a design choice to discuss before relying on a spreadsheet for busy production intake.
3. Create and record the workspace
Create the project folder and save its identifier in the project record. n8n’s Google Drive integration supports folder and file operations [S1]. The client should receive access only to the intended workspace. Confirm the recipient and permission level before sharing.
Folder structure should reflect delivery needs. A design engagement might need Client Materials, Working Files, and Deliverables. A finance engagement may need a more restrictive structure. The folder design should be agreed before it becomes an automatic action.
4. Send useful welcome instructions
A welcome email should tell the client what to provide, where to provide it, who owns the next step, and when the team expects a response. Avoid requesting passwords by email. Use the relevant platform’s account invitation or another agreed secure access method.
Treat the message as a request for materials, not proof of collection. Sending an upload link does not establish that the right documents arrived. File monitoring, completeness checks, and reminder schedules are separate features that need their own rules.
5. Hand off to the delivery owner
Send an internal notification with the project reference, folder link, client contact, and current status. The owner should know whether the project is ready to begin or still awaiting materials. Keep a visible exception queue so unusual requests do not disappear inside inboxes.
Plan for partial completion
Imagine the folder is created successfully but the email step fails. Starting the entire process again could create another folder or resend earlier messages. Record completed stages and design recovery around the failed step. Use a stable key to recognize an action that has already happened.
n8n supports error workflows for handling failures [S2]. Configure an alert with enough context to find the affected project, and decide who will investigate. Test the actual trigger and failure path; a successful manual run does not prove that scheduled or production handling is correct.
Test the handoff before using real client data
Try a valid new project, a repeated reference, a missing email, an invalid owner, a sharing failure, and a failed welcome message. Check both the outputs and the status after each run. Confirm that the client cannot open another client’s folder and that the internal owner receives a usable link.
An illustrative test is to submit WEB-1042 twice. The expected outcome is one project workspace, an identifiable repeat submission, and no second welcome email unless a person deliberately authorizes a resend. This is a proposed acceptance test, not a claim about measured client results.
Measure readiness, not just email delivery
Track time from approved intake to completed setup, projects awaiting materials, repeat submissions, and cases needing manual repair. Define setup completion separately from kickoff readiness. Compare a small sample before and after rollout, using the same definitions.
For an example of the initial setup stages, explore my client onboarding workflow demonstration. It shows a portfolio implementation of project setup and welcome coordination. Automatic document completeness checks and reminders should be scoped separately rather than assumed from the project name.
Common questions
Can onboarding be automated without replacing our existing tools?
Often, the process can be designed around the tools already in use. Confirm access permissions, supported integrations, and the ownership of each record before committing to a build. A short discovery session should establish those constraints.
Does client onboarding automation require AI?
No. Required-field checks, folder creation, routing, and approved welcome messages can use explicit rules. AI may help with unstructured information, but it adds another output to validate and is unnecessary for many first versions.
What should remain manual?
Keep relationship-sensitive decisions, unusual permissions, and final readiness approval with the appropriate person. The workflow should make those decisions easier to see and complete.
Build a clear starting point
Choose one service, one intake route, and a defined handoff. If you want help designing that process, discuss your client onboarding process. Share the tools you use and the step that currently requires the most chasing.